Wednesday, September 30, 2009

Osso-Bucco

Osso-BuccoIn the early Spring we were at a dinner party with 14 or 15 good friends and our hostess announced her entrée while we were having a glass of wine and some hors devours. She warned not to eat too much because she was serving Osso Buco with Rissoto and it was going to be a challenge to finish if we were not hungry.
The announcement of the Osso Buco delighted me since it is one of my favorite dishes but I had never prepared it for company or even for ourselves at home..

It looked like a big deal to prepare and easily finding veal shanks where I live is problematic. The meal that Mary prepared that night dispelled all reasons for not trying Osso Buco at home. Mary and her husband have not always shared special recipes which I understand, but under pressure she released her Osso Buco to me to share.

I’m working on getting the secrets of a few other terrific dishes that she and her husband have served through the years. The release of the Osso Buco will have to suffice for now. Maybe I can get her to unlock the secret of her Flan recipe later this year.
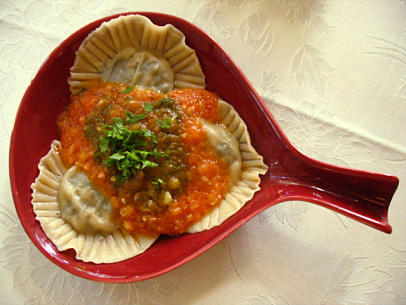

Mary’s Osso Buco

Ingredients:

6 pieces veal shank 3” thick( with marrow bones)
1 cup flour
2 tbsp. butter
2 tbsp. olive oil
2 tsp. salt
½ tsp. freshly gound pepper
¾ cup chopped onion
¼ cup grated carrots
1 tsp. basil
1 tsp.. basil
2 tbsp. tomato past
1 cup dry white wine
½ cup water
2 tsp grated lemon rind
1 clove garlic
2 tbsp. minced parsley

Preparation:
Step 1. Roll veal shanks lightly in flour
Step 2. Heat butter and oil in a heavy sauce pan or Dutch oven
Step 3. Brown shanks very well
Step 4. Turn bones upright
Step 5. Add salt, pepper, onion, carrots and basil
Step 6. Cover and cook over low heat for 10 minutes
Step 7. Mix wine, tomato past and water and to pan.
Step 8.Cook for1 ¾ hours over low heat till meat is tender
Step 9. Add lemon rind, garlic and parsley> Cook for 5 minutes
Step 10. Discard garlic before serving

Service: Serve with boiled rice or plain risotto garnished with parsley

After thought: Summer is a great time but cooler weather opens up the possibility for preparing a host of meals that are really not part of our summer menu. Osso Buco is one such item. The cool weather that I woke up to this morning brought the Osso Buco to mind along with Braciole and a few other favorites that will be part of our fall family menu.

Buck Cooks is a daily blog covering the best recipes and kitchen cookware information.

Sunday, September 27, 2009

Oil Roasted Vegetables


This is the season that brings an abundance of fresh harvested vegetables to the farmer’s markets. A platter of oil roasted vegetables served as a side dish is an especially attractive addition to any dinner table

There are many combinations you can use but our favorites for color, texture and taste are green beans, yellow squash, zucchini and red and yellow bell peppers. This combination has received huzzahs when ever we have served it. It is also a great dish as a contribution to a pot luck dinner. It travels well and doesn't need reheating at the event.

The recipe is simple:

Step 1. Preheat oven to 375’
Step 2. Wash and Dry vegetables
Step 3. Except for green beans* cut vegetables in strip1/2-1” wide & about 3” long
* Green beans to be added whole for roasting after first blanching for a few minutes
Step 4. Arrange in a shallow baking dish in a single layer( you may need to do two batches depending on the amount you wish to serve)
Step 5. Brush vegetables with olive oil
Step 6. Sprinkle with course salt-about 1-2 tablespoons. They can stand more salt than you would think
Step 7. Bake in oven about 20 minutes until slightly limp

Serve on a large platter slightly warm or at room temperature. Arrange the vegetables in separate groupings on the large platter rather than mixed, so guests can select preferences

Tip: The comment on salt should be considered. The only mistake we have made with this recipe is too little salt. Don’t pile it on but be slightly more liberal in your application than instinct indicates. (Note that I said Slightly)

Wednesday, September 23, 2009

Pot Luck Pasta


Sometimes the best meals are concocted from imagination and ingredients at hand. As often happens we came home at ithe end of a busy day with no meal in mind. Dorothy looked in the fridge and said we have a package of spinach ravioli that I’ll do something with….She in minutes created a sauce for the ravioli that is great, quick and can be used with various pastas.

Her ingredients were in the refrigerator and the only additional ingredient needed was imagination.

Ingredients:

3 green onions sliced

1 clove garlic minced

½ cup chopped fresh tomato

½ cup frozen peas

3 slices of bacon cooked crisp

¼ cup chopped parsley and fresh basil combined

3 Tbsp Extra Virgin Olive oil

½ cup-half & half

Parmesan cheese for garnish

Directions:

Step 1. sauté onions and garlic in olive oil for 1 minute (med-hot pan)

Do not allow garlic to burn.

Step 2. add tomatoes and continue to sauté 1-2 additional minutes.

Step3. add peas, bacon, parsley, basil and half & half, lower heat to medium and simmer for a few minutes.

Pour over hot, cooked pasta that has been placed in warmed serving dishes.

Sprinkle with grated Parmesan cheese. Garnish with a sprig or two of fresh parsley

Makes 2 to 3 servings

Serve immediately

Tips: This dish, when using spinach ravioli is best served individually rather than in a large serving dish. The peas and tomatoes centered on the top of the ravioli is very attractive and contrasts with typical pasta serving with the sauce mixed throughout the pasta. Chianti is the perfect accompaniment to this dish and luckily that was in the cupboard waiting to join in the pot luck evening.
Buck Cooks is a daily blog covering the best recipes and kitchen cookware information.

Monday, September 21, 2009

Fish On A Budget


Fish is no longer the inexpensive dish that it was when I was young. Lobster was never really cheap but fish was generally looked upon as an item that helped stretch the weekly food budget. Fresh fish has now become a budget buster if careful shopping is not the first step in meal preparation.

Since I now live in an area where fresh fish often has traveled several thousand miles after being caught, fresh is somewhat of a misnomer to attach to the fish being sold. We have been checking out alternatives to the sole , red snapper and tuna that is on display at high prices in our local markets.

Several frozen entries from Asia and Australian waters have caught our attention and are helping fill the family fish meals without a budget breaking price.

We recently tried the Barramundi Frozen fillets that are appearing in the frozen fish cases of our local markets. These are surprisingly good and deserve your attention.
The Barramundi we tried were Wild Caught. There are also Barramundi fish farms in Australia producing great quantities of this fish for the world market.. The fish is frozen in fillets that are generally about 6 ounces and cost about $2 per fillet.

We prepared the fish using a simple baked technique and accompanied it with a rice dish that worked well with this excellent fish.

Baked Barramundi and Rice Indonesian

Ingredients:
Fish:
4 Barramundi fillets 6 oz each
½ cup butter
1 lemon

Rice
4 cups cooked rice
½ cup frozen peas- cooked
½ cup chopped onion
1 clove garlic minced
2 cups fresh spinach leaves
salt
1/4 Tsp cayenne
¼ tsp cinnamon
1Tbsp cumin


Preparation- Fish

Step 1. Preheat oven to 400 degrees
Step 2. Melt ½ cup of butter in a baking dish
Step 3. Coat both sides of the fillet with the melted butter.
Step 4. Season the fish with salt and squeeze lemon juice over the fillets.
Step 5. Bake for about 20 minutes until fish flakes when tested with a fork

Rice Preparation:

Step 1. In a skillet sauté in extra virgin olive oil–the onion, minced garlic, spinach till wilted, add cooked peas, cayenne pepper,cumin and cinnamon
Step 2. Add 2 cups of cooked rice.
Add salt & pepper to taste.
Step 3. Then saute all ingredients together until heated through.

Service:
Serve fish and rice on a warm plate with dash of paprika and chopped parsley as a garnish on the fish

Cost:
This Barramundi and rice dish can reach your table for about $3 per serving and will meet the family needs for a reasonably priced, excellent tasting, healthy fish entrée.. Our experience is that the Barramundi is still a quality fish even after freezing and transport.

Afterthought: Search for the Barramundi, it is becoming generally available. The recipe will work with any firm white fish. Barramundi is an aboriginal name meaning large scaled perch. There are various names. Barra, giant perch and others but Barramundi is the name being marketed in America

Buck Cooks is a daily blog covering the best recipes and kitchen cookware information.

Wednesday, September 16, 2009

Coffee: Best Home Brewed


I’m a coffee drinker. I make it at home, drink it in coffee shops and end every dinner in a restaurant with a cup of coffee. Somewhere along the coffee drinking trail I came to realize that the vast differences in the quality the coffee I was drinking was worth figuring out.

The .25 cent cup of coffee that I used to drink in a diner on the way to work was simply a caffeine boost to get me rolling. The enjoyment was often only minimal. I got to thinking seriously about coffee after an excellent cup I had after dinner at a friend’s house many years ago. I thought that if this is Maxwell House or Folgers they must have a brewing secret about which I didn’t have a clue.

I asked about the coffee and my friend went into a rhapsody about his insistence on Arabica beans and his current find of genuine Mocha from Yemen which were the beans he ground, brewed and served to us that night. My dumb look stimulated a brief explanation of the difference between Arabica and Robusta beans and why I should only think Arabica.

My experimentation and reading started after that dinner and it seems in recent years much of America has had a similar stimulus to upgrade the quality of coffee being consumed. I found with just a little attention, great coffee can be prepared at home without the intense detail that my friend followed in his coffee preparation.

The coffee beans of the world are similar in their diversity of flavor as the nuances found in wine. Storage, roasting and grinding methods are all important in defining the flavor and body of the cup of coffee. The flavor is produced by the combination of acidity, aroma and body. Body is the weight or thickness you feel on your tongue when drinking your coffee.

There should be a taste test opportunity with coffee like there is with wine at the vineyards. I have spent years doing my own taste tests and have switched favorites often.
My current favorite is from Kenya. This is the second or third period that I have decided I prefer Kenyan coffee. My Kenya coffee preference has been interrupted from time to time and often it is Guatemala that interjects it’s acidic flavor into first place in my coffee bean list.

Find an independently owned coffee shop that also retails coffee and features different coffees as the house coffee during the week. This is a good way to get a sense of diversity available and which bean you prefer.

In a pinch Medellin from Columbia makes a good balanced non- controversial cup of coffee. The coffee from Columbia is all Arabica and hand picked, which is an important part of the process. If you are a regular at one of the famous coffee chains, coffee experimentation would be worth pursuing. Learning about the drink is fun and the a good cup of coffee at home can be a big money saver.

Making a good cup of coffee for yourself or for dinner guests need not be a complicated affair . An automatic drip coffee maker produces excellent coffee without much problem. Braun, Krup and many others make drip coffee makers that do an excellent job.

There are a few steps that will help make your coffee special

Step 1. When you select your coffee buy the beans
Step 2. Grind the beans just before making the coffee
Step 3. Measure 2 level table spoons of the ground coffee per cup
Step 4. Add fresh spring water (6 ounces per cup)
Step 5. When the coffee is done filtering serve promptly

Details: At a dinner party I brew the coffee and place it in an air pot which keeps it hot without further cooking. Leaving a coffee pot on the heat deteriorates the quality rapidly and it becomes bitter in taste.

It is important that you add water that tastes good. Municipal water with chemical additives might be good for your safety but often is not so great to make coffee. Remember coffee is mostly water.
Using freshly ground beans is important. Once ground, coffee loses quality much more rapidly than if stored as beans.
I do not use sugar with my coffee. Sugar detracts from a well brewed cup of coffee.
Buck Cooks is a daily blog covering the best recipes and kitchen cookware information.

Friday, September 11, 2009

Chicken Cacciatore

In our household, certain recipes are prepared only when an important major ingredient is in season locally. Chicken Cacciatore is an example and now is the time to cook this succulent dish. Fresh tomatoes from your garden or the farmers market are the important ingredient that transforms this dish into something very special. Canned or hothouse tomatoes just will not do the job.

When I was a kid my family often ate Sunday dinner in a restaurant called Cinelli’s Country House in New Jersey. They really knew about Chicken Cacciatore and that was what I ordered every time we ate there.
The Country House is long gone and I pursued my cacciatore memories for years. This recipe ended the pursuit. My wife insists on the fresh tomatoes and that is what puts our Chicken Cacciatore into a league of it’s own.

Ingredients:
2 tablespoons oil
1 frying chicken cut up
1 large onion peeled and chopped
1 medium green pepper, cored, seeded & chopped
2 cloves garlic minced
3 ½ cups fresh ripened tomatoes, peeled, seeded & chopped
1 8oz. can tomato sauce
½ cup red wine(chianti)
2 teaspoons salt
½ teaspoon pepper
½ teaspoon allspice
½ teaspoon dried thyme
2 Bay leaves
¼ cup Chopped Italian Parsley (for garnish)
¼ cup Parmesan cheese(for garnish)

Preparation:
Step 1. Heat oil in a large skillet or Dutch oven and sauté chicken pieces until golden on all sides.
Step 2. Remove chicken from skillet
Step 3. Add onions, green pepper and garlic and sauté lightly
Step 4. Add remaining ingredients and cook for three minutes
Step. 5 Return Chicken to skillet
Step 6. Simmer uncovered for 45-60 minutes until chicken is fork tender

Serve with crusty Italian bread and garnish with parsley and Parmesan. It also works well over Risotto

Tips To peel tomatoes-Cover with boiling water for a few minutes –Plunge into ice water and peel skins away easily.
Cacciatore is even more flavorful the second day. You can prepare this a day in advance if entertaining.
Parmigiano Reggiano is always the preferred Parmesan to use. Buy some grated and freeze. It is special and also a bit expensive, but as a garnish adds a special touch.


Buck Cooks is a daily blog covering the best recipes and kitchen cookware information.

Thursday, September 10, 2009

Southern Fried Chicken: An American Recipe


We have been invited to a celebration of citizenship on Saturday. A couple from France with whom we are friends have just become United States citizens and a big party for about 50 people is being thrown to celebrate.

They asked the hostess (also a friend of ours) to tell everyone that no presents are required but that everyone should bring their favorite American recipe on a 3×5 card. The are becoming citizens but remember they are from France and food remains important

So many of our recipes have other country origins, that we had to think about a recipe that was strictly American. It took a little thought because not only must it be an American recipe but it needed to be a great one since, our friends really understand food

We decided to share our special recipe for:

Southern Fried Chicken

Ingredients:
2 ½ -3 lbs chicken, cut up
3 cups buttermilk
salt
2 onions sliced thin
1 cup flour
3 tsp. Kosher or sea salt
½ tsp. cayenne pepper
1 tsp. cracked black pepper
1 cup vegetable shortening
½ cup butter

Preparation:
Step 1. Place chicken in bowl and sprinkle with salt & let set for 2 hours
Step 2. Remove salt by rinsing with water
Step 3. Place chicken back in the bowl and cover with onions and buttermilk
Step 4. Cover and refrigerate overnight
Step 5. Place flour, salt(3 tsp)cayenne and black pepper in a paper of plastic bag-shake to mix.
Step 6. Drain chicken & place in bag one piece at a time. Shake to coat with flour mixture
Step 7.Repeat until all pieces are coated & keave to dry and come to room temperature.
Step 8. Melt shortening and butter in large skillet over high heat. Add chicken and cover
Step 9. Lower heat to medium and cook for 10 minutes then turn and cook for 8 minutes

Service: Pile on a serving platter and everyone, take a piece of this great fried chicken

Tip: Take a quick peek at the chicken after 6 minutes to make sure your heat is right to get a golden brown chicken after 10 minutes on that first cooked side. Adjust the heat up or down as needed.

Bobby Flay and Philly Pizza

800px-Supreme_pizza
Bobby Flay recently did a segment on the CBS Morning Show on Pizza. He of course focused on New York where he is from. New York has great pizza and is where pizza came to America in the early 1900’s. Flay didn’t explain why most New York Pizza makers have a crick in their neck. It doesn’t come from anything to do with making pizza. It comes from looking down the turnpike to Philadelphia trying to figure out why Philly has such “really” great pizza.

Philly has thin crust outstanding pizza with every neighborhood boasting that theirs is the best pizza in Philly and it is from the shop “down the street”. The pizza proponents from Philly and NY probably will never yield in their contest as to where the best pizza is made. The one thing that they will agree upon is, that the best pizza in America continues to be produced in that East coast stretch from Southern Connecticut to Wilmington Delaware with New Jersey occupying the heart of the area.

It is easy to understand why the pizza is excellent in this stretch of America. It is where the Italians are located. I don’t mean that only Italians make great pizza but they definitely set the standard for all the pizza makers in the East.

Flay in his CBS piece said that the pizza you grow up with is the pizza that is the standard by which all others are judged. I think that is true. I grew up with Philly Italian Style Pizza and I still think it is best. I can recognize an East Coast pizza maker wherever he is making that pizza.

I was in a pizza joint in North Boulder Colorado that has great pizza, helping to roll the dough balls one day. I suggested a Wolfgang Puck technique of finishing the dough by rotating/rolling it on the table for 30 seconds. The owner a Philly guy, who is related to me, trained in Philly and committed to excellence turned to me and commented: “Puck is from Austria and I’m not about to copy an Austrian making Pizza. Pastry yes, pizza no! If Tacanelles or Station Pizza does it I’ll try it. That’s not pizza Puck is making it’s something else” Needless to say the pizzas referred to by the Philly expatriate in Boulder are in Philly.

When you are in New York be sure to try the pizza . I know you’ll love it. You also now know why the NY pizza maker has that crick in his neck. It’s from continuously looking down the turnpike towards Philly trying to see how really great pizza is made.

Making Pizza at home:

Making a pizza at home can be a fun family activity. There are a few items needed to make a good pizza in your home oven. You will need a baking stone to put into the oven and a peel on which to prepare the pizza and slide it onto the stone. These are not expensive and when purchased can be used for years. Amazon has these items reasonably priced Old Stone Oven Pizza Stone Round

When you are ready to bake your first pizza contact your favorite pizza maker and get them to sell you a dough ball or two. A 14" pizza is a good size to try at home.

Getting ready: Put your Pizza baking stone onto the lower rack of the oven. All other racks removed preheat the oven to 500'

Step.1 Work the dough ball flat and round on a floured counter surface. Use both palms ,press down and rotate the dough until it is pretty round and less than a 1/2" thick
Step.2 With a rolling pin work the dough thin and smooth turning the dough 45degrees after each roll or two to maintain its round shape
Step 3. This is a bit tricky and easier to show than explain. Pick up the dough and drape it over the backs of both hands that are in a semi fist configuration. Move the dough from fist to fist to complete the forming of a round pizza
Step 4. Put the pizza on the peel which has been lightly floured.
Step 5. Dress the pizza lightly with tomato sauce then cheese and your favorite topping.
Step 6. Slide the pizza off the peel onto the hot stone in the oven. Tilt the peel about 20degrees with front edge touching the stone. A few short backward jerks of the peel will slide the pizza onto the stone

In a 500' oven the pizza should take about 8 to 10 minutes. Remove the pizza by sliding the peel under the cooked pizza and bring it to the table to cut into 6 or eight slices

Tips: Don't load the pizza with sauce and cheese. Keep it light until you get the technique down pat.
When you buy the dough Balls ask if you can watch a pizza being formed so you can figure out the back of the hands rotation. It's really not a big deal. A little practice and you will be fine

Buck Cooks is a daily blog covering the best recipes and kitchen cookware information.

Labels: , ,